
This page contains instructions for a variety of tasks with the Glovebox.
Manufacturers manual for glovebox.
Regular Maintenance
Purchasing argon
Reach out to Corinne (cmr47@cornell.edu) if you need Cornell e-Shop access.
Use e-Shop to purchase Industrial Grade Argon, Size 300 High Pressure Steel Cylinder, CGA-580 (Catalog # AR300) from Airgas.
Changing argon tank
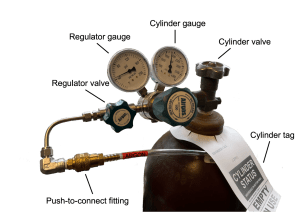
When the tank pressure on the cylinder drops below 500 psi, it is time to change the argon tank.
Removing an empty cylinder:
- Close the regulator valve.
- Close the cylinder valve.
- Disconnect the brass push-to-connect fitting.
- Carefully use the large wrench to unscrew the regulator from the gas cylinder.
- Place the regulator in a safe place.
- Screw the valve cap onto the gas cylinder and rip the “in use” label from the tag.
- Carefully move and secure the gas cylinder to the cylinder rack by the front door.
Connecting new cylinder:
- Carefully move a full gas cylinder to the rack close to the glovebox.
- Secure the glovebox with both straps.
- Remove the valve cap and place it on the windowsill next to the cylinder (If the cap can’t be removed by hand, use the strap wrench).
- Carefully screw on the regulator by hand. Once it’s on by hand, tighten with the large wrench.
- Check that the regulator valve is closed. Slowly open the regulator valve and watch the tank-side pressure gauge (should be above 2500 psi).
- Listen for any leaks (if there is a leak at the regulator connector, tighten the nut. If there is still a leak, close the tank valve and reconnect the regulator. If there is still an issue, try a different gas cylinder).
- Slowly open the regulator valve and quickly close to allow argon to quickly flow through the regulator (<1 second is plenty).
- Reconnect the brass push-to-connect fitting.
- Open the regulator valve.
Oil Change
Twice a year the vacuum pump oil should be changed.
Drain vacuum pump:
- Close the vacuum port and be sure that the glovebox chamber is stable. Do not use the glovebox during this process.
- Turn off the vacuum pump and allow the pump to rest and cool off.
- Disconnect hoses.
- Take the vacuum pump out from under the glovebox and move to an elevated location (the lab stools are a decent place).
- Prepare an empty container for the used oil.
- Place the opening to the empty container just under the drain spout.
- Carefully unscrew the oil drain cap. The oil will come out fast!
- Allow all the oil to drain into the container until it is just dripping out.
- Screw back the drain cap and clean up any excess oil in the area.
Fill vacuum pump:
- Find and unscrew the oil fill cap on the top of the pump.
- Fill the pump with the new oil and watch the oil level from the watch glass.
- Fill until the oil level is in the middle of the watch glass.
- Put the vacuum pump back under the glovebox.
- Reconnect all hoses to correct ports.
- Turn on the vacuum pump.
- Check the vacuum by opening the vacuum valve connected to the antechamber.
Regeneration
Establish an inert atmosphere in the glovebox before starting regeneration.
- Main power switch on, blower off, pressure control on, and vacuum pump on.
- Set the SSG red lights to +2” and +1”.
- Check the regeneration gas (3% H2 in Ar). The cylinder should have at least 1000 psi of gas. Set regulator pressure to about 10 psi.
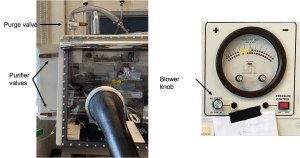
- Set the Regenerate/Circulate switch to Regenerate. The Regenerate light does not come on yet. Close the purifier valves on the right hand side of the glovebox.
- Press and hold the Purge Test switch. Set Regeneration gas flow rate to 25 CFH.
- Hold this test for 60 seconds to assure that the flow rate does not drop. Release the Purge Test switch.
- Press the Regeneration Programmer switch for two seconds and release it. The Regenerate light and Refill light will come on. After approximately 3 minutes, the Heat light will come on and regeneration will proceed automatically (up to a 12 hour process).
- After regeneration is complete, when ready to resume circulation, reset Regenerate/Circulate switch to circulate. Open purifier valves and turn the blower switch on.
O2 Sensor Change

The sensor is provided in a special sealed bag. Do not open this until you are immediately ready to install the sensor.
Note: Before installing sensor, turn OFF analyzer power by unplugging power cord to the wall mount power adapter.
- With oxygen analyzer power off, rotate the SAMPLE/AIR CAL gas selector valve to the AIR CAL position.
- Unscrew the cell block cap, being careful not to lose the O-ring.
- Carefully remove the old cell by pulling the tab on the sensor label.
- Inspect the cell block cavity, and if there is any sign of moisture, clean it out with a Q-tip or similar. Make sure that the contact springs inside the block are intact. Be careful not to snag them with the Q-tip.
- Carefully open the bag using a pair of scissors or a knife. Make sure you don’t cut yourself or stab the sensor! Make sure that there is no sign of any liquid in the bag, if so, do not proceed – you need a new sensor.
- Remove the plug or other device that acts as a shorting clip. This may be found on the
- contact plate on the top of the sensor.
- Holding the sensor by its tab, membrane side down, slide it into the cell block (gold plated contact side of sensor should be facing up touching the cell block contacts). The membrane side is covered by a convex gold plated mesh.
- Immediately re-apply power and perform air calibration
Operation
Glovebox usage
- If you need to move items in or out of the glovebox, see Antechamber usage.
- Once your materials and supplies are in the desired location, you can begin to use the glovebox.
- Lab coats and gloves are available to use to cover arms and hands, if desired.
- Insert hands and arms through glovebox gloves. You can use the foot pedal to remove argon faster. Be sure to watch the pressure gauge. Do not let the pressure go below zero!
- Please use the large glove provided in the glovebox when handling liquids, chemicals, or powders.
- Be extremely careful when using sharp items such as razor blades and needles.
- Please use the provided mats and trash can with a bag.
- Let someone know if the glovebox is low on any supplies (e.g. plastic bags, wipes, mats).
- Once finished, please clean up and put items and bins back.
- When removing arms, please do so slowly so as to not drop the interior pressure below zero.
- Wipe down the gloves with isopropyl alcohol.
Antechamber usage
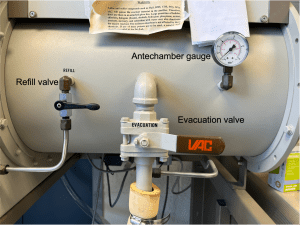
Moving items into antechamber:
- Check the argon cylinder gauge. If the pressure is below 500 psi, change the argon cylinder.
- Check the antechamber gauge. If the pressure is below zero inHg, refill the antechamber by making sure the evacuation valve is closed and slowly open the refill valve until the antechamber gauge reads zero inHg.
- Once the antechamber gauge reads zero, close the refill valve.
- Open the outside door and load in the items to be transferred.
- Be sure to secure loose items such as tissues and paper.
- Be sure that all plastic bags have holes or aren’t fully closed and vials have lids loosened.
- Securely close the outside door.
Purge the antechamber:
- Close the refill valve and open the evacuation valve.
- Wait until the gauge reads -30 inHg.
- Close the evacuation valve and slowly open the refill valve until the gauge reads 0 inHg.
- If the items being transferred are mostly made of metal and glass, repeat the purge process 3 times.
- If the items being transferred contain a significant amount of paper and plastic, purge twice and then leave under active vacuum (evacuation valve left open) for at least 6 hours. Then purge once more.
Moving items from antechamber to glovebox:
- Make sure that the antechamber has been purified with the purge process. If you are unsure, purge again.
- Make sure the antechamber gauge reads zero inHg.
- Open the glovebox antechamber door and carefully remove items and place them in the glovebox.
- Close the glovebox antechamber door.
Moving items from glovebox to antechamber:
- Make sure that the antechamber has been purified with the purge process. If you are unsure, purge again.
- Make sure the antechamber gauge reads zero inHg.
- Open the glovebox antechamber door and carefully place items in the antechamber.
- Close the glovebox antechamber door.
Once you are done with the antechamber, close the refill valve and leave open the evacuation valve.
Purging
In the event of a large spike (>15 ppm) in water or oxygen due to opening a contaminated container or antechamber, you must purge the system.
Prepare for purge:
- If a contaminated container caused the spike in water or oxygen, place it back into the antechamber.
- Close both antechamber doors.
- Turn off the blower.
- Close both purifier valves on the far right side of the glovebox.
- Check to see that the argon cylinder has >1000 psi.
Purge:
- Slowly open the purge valve. You should hear a clicking sound of the solenoid valve opening and closing.
- Continue opening the valve until the click stops and there is a steady flow of argon into the glovebox.
- Continue to adjust the purge valve so as to not allow the gloves to deflate.
- Watch the sensor readings drop.
- Once both sensors read < 10 ppm, close the purge valve.
- Open both purifier valves and turn on the blower to full.
- Open the evacuation valve and keep the antechamber under active vacuum.
- Wait and do not use the glovebox until the sensors read < 1 ppm.